Laravel 9 product filters using custom price range slider and ajax
Product filters for a website is very much essential for its's user's now a days. It gives your visitors flexibility to choose their desire product between a price range. We can filter products lots of way like their category, subcategory, tags, gorups, colors, size, price range and many more. In this lesson we will learn filter products among a price range using laravel, ajax and price range slider, also filter products by highest and lowest price. We don't use any third party slider plugin but we make a nice slider using few lines custom javascript code. For doing this task we have to following the bellow steps.
1. New or existing project
2. Create database and connect
3. Make model and migration
4. Add products field in migration file and run migrate command
5. Insert some products in table
6. Create routes
7. Create controller and write logics
8. Create css and js for custom slider
9. Create blade file inside views
10. Test app
Step-1: New or existing project
At the beginning of the tutorial we will install a new laravel project. If you wish you can apply this in your existing project.
Create a new project name product-filters in your machine using the composer command
composer create-project laravel/laravel product-filters
Step-2: Create database and connect
You can use your old database or just create a new one and placed database info in project .env file show in bellow.
.env
DB_CONNECTION=mysql
DB_HOST=127.0.0.1
DB_PORT=3306
DB_DATABASE=product_filters
DB_USERNAME=root
DB_PASSWORD=
Step-3: Make model and migration
Using the bellow artisan command let's our model and migration file
//model and migration
php artisan make:model ProductFilter -m
Step-4: Add products field in migration file and run migrate command
See inside database directory migration file has created and in App\Models ProductFilter.php model is create. Ok, now we add all requred fileds for create_product_filters_table.php into migration file shown as bellow.
create_product_filters_table.php
<?php

use Illuminate\Database\Migrations\Migration;
use Illuminate\Database\Schema\Blueprint;
use Illuminate\Support\Facades\Schema;

return new class extends Migration
{
    /**
     * Run the migrations.
     *
     * @return void
     */
    public function up()
    {
        Schema::create('product_filters', function (Blueprint $table) {
            $table->id();
            $table->string('image')->nullable();
            $table->string('name');
            $table->text('description')->nullable();
            $table->double('price');
            $table->timestamps();
        });
    }

    /**
     * Reverse the migrations.
     *
     * @return void
     */
    public function down()
    {
        Schema::dropIfExists('product_filters');
    }
};
Step-5: Insert some products in table
Insert some products so that you can display in frontend and search by a price range. We are not focusing on product insert but we focus on searching. You can store your products into database manually, using seeder, factory or upload by a csv file etc.
Note: for insert product image don't forget to make an images folder inside public directory.
Step-6: Create routes
Just create two routes in web.php file, first one is for displaying all products and second one is for search query
Note : Don't forget to import your controller at top of the file
web.php
<?php

use Illuminate\Support\Facades\Route;
use App\Http\Controllers\ProductFilterController;


Route::get('/',[ProductFilterController::class,'all_products'])->name('all.products');
Route::get('/search-product',[ProductFilterController::class,'search_products'])->name('search.products');
Route::get('/sort-by',[ProductFilterController::class,'sort_by'])->name('sort.by');
Step-7: Create controller and write logics
Run artisan command for create controller and paste the code in your own controller
php artisan make:controller ProductFilterController
ProductFilterController.php
<?php

namespace App\Http\Controllers;

use App\Models\ProductFilter;
use Illuminate\Http\Request;

class ProductFilterController extends Controller
{
    public function all_products()
    {
        $all_products = ProductFilter::all();
        return view('welcome',compact('all_products'));
    }

    public function search_products(Request $request)
    {
        $all_products = ProductFilter::whereBetween('price',[$request->left_value, $request->right_value])->get();
        return view('search_result',compact('all_products'))->render();
    }

    public function sort_by(Request $request)
    {
        if($request->sort_by == 'lowest_price'){
            $all_products = ProductFilter::orderBy('price','asc')->get();
        }
        if($request->sort_by == 'highest_price'){
            $all_products = ProductFilter::orderBy('price','desc')->get();
        }
        return view('search_result',compact('all_products'))->render();

    }

}
Step-8: Create css and js for custom slider
We build a custom js slider, so for that we need some css and js code for design and get slider range value. If you want to user other slider than it's up to you means you are free to use other slider, just skip this step. But if you are ready to use our custom slider just create a css and js file and paste the bellow code. Now create a css file named style.css and a js file name script.js inside the public\css and public\js directory.
public\css\style.css
#rangeValue {
    position: relative;
    text-align: center;
    width: 60px;
    font-size: 1.25em;
    color: #fff;
    background: #27a0ff;
    margin-left: 15px;
    border-radius: 25px;
    font-weight: 500;
    box-shadow: 5px 5px 10px rgba(0, 0, 0, 0.1), -5px -5px 10px #fff, inset 5px 5px 10px rgba(0, 0, 0, 0.1), inset -5px -5px 5px rgba(255, 255, 255, 0.05);
}

.middle {
    position: relative;
    width: 100%;
    max-width: 500px;
    margin-top: 10px;
    display: inline-block;
}

.slider {
    position: relative;
    z-index: 1;
    height: 10px;
    margin: 0 15px;
}

.slider>.track {
    position: absolute;
    z-index: 1;
    left: 0;
    right: 0;
    top: 0;
    bottom: 0;
    border-radius: 5px;
    background-color: #b5d7f1;
}

.slider>.range {
    position: absolute;
    z-index: 2;
    left: 25%;
    right: 25%;
    top: 0;
    bottom: 0;
    border-radius: 5px;
    background-color: #27a0ff;
}

.slider>.thumb {
    position: absolute;
    z-index: 3;
    width: 30px;
    height: 30px;
    background-color: #27a0ff;
    border-radius: 50%;
}

.slider>.thumb.left {
    left: 25%;
    transform: translate(-15px, -10px);
}

.slider>.thumb.right {
    right: 25%;
    transform: translate(15px, -10px);
}

.range_slider {
    position: absolute;
    pointer-events: none;
    -webkit-appearance: none;
    z-index: 2;
    height: 10px;
    width: 100%;
    opacity: 0;
}

.range_slider::-webkit-slider-thumb {
    pointer-events: all;
    width: 30px;
    height: 30px;
    border-radius: 0;
    border: 0 none;
    background-color: red;
    cursor: pointer;
    -webkit-appearance: none;
}

#multi_range {
    margin: 0 auto;
    background-color: #27a0ff;
    border-radius: 20px;
    margin-top: 20px;
    text-align: center;
    width: 90px;
    font-weight: 500;
    font-size: 1.25em;
    color: #fff;
}
public\js\script.js
const input_left = document.getElementById("input_left");
const input_right = document.getElementById("input_right");

const thumb_left = document.querySelector(".slider > .thumb.left");
const thumb_right = document.querySelector(".slider > .thumb.right");
const range = document.querySelector(".slider > .range");

const set_left_value = () => {
    const _this = input_left;
    const [min, max] = [parseInt(_this.min), parseInt(_this.max)];

    _this.value = Math.min(parseInt(_this.value), parseInt(input_right.value) - 1);

    const percent = ((_this.value - min) / (max - min)) * 100;
    thumb_left.style.left = percent + "%";
    range.style.left = percent + "%";
};

const set_right_value = () => {
    const _this = input_right;
    const [min, max] = [parseInt(_this.min), parseInt(_this.max)];

    _this.value = Math.max(parseInt(_this.value), parseInt(input_left.value) + 1);

    const percent = ((_this.value - min) / (max - min)) * 100;
    thumb_right.style.right = 100 - percent + "%";
    range.style.right = 100 - percent + "%";
};

input_left.addEventListener("input", set_left_value);
input_right.addEventListener("input", set_right_value);

function left_slider(value) {
    document.getElementById('left_value').innerHTML = value;
}
function right_slider(value) {
    document.getElementById('right_value').innerHTML = value;
}
Step-9: Create blade file inside views
Now we will create our all required blade files inside resources\views

welcome.blade.php
<!doctype html>
<html lang="en">
  <head>
    <meta charset="utf-8">
    <meta name="viewport" content="width=device-width, initial-scale=1">
     <meta name="csrf-token" content="{{ csrf_token() }}">
    <link href="https://cdn.jsdelivr.net/npm/bootstrap@5.1.3/dist/css/bootstrap.min.css" rel="stylesheet">
      <link rel="stylesheet" href="{{ asset('css/style.css') }}">
    <title>Laravel 9 Ajax Product Filters</title>
  </head>
  <body>
      <div class="container">
         <div class="slider-area">
             @include('slider')
         </div>
          <div class="search-result">
              @include('search_result')
          </div>
      </div>

     <script src="https://ajax.googleapis.com/ajax/libs/jquery/3.6.0/jquery.min.js"></script>
     <script src="{{ asset('js/script.js') }}"></script>
     <script>
        $.ajaxSetup({
            headers: {
                'X-CSRF-TOKEN': $('meta[name="csrf-token"]').attr('content')
            }
        });
     </script>
     <script>
        $(document).ready(function(e){
           $('.range_slider').on('change',function(){
               let left_value = $('#input_left').val();
               let right_value = $('#input_right').val();
               // alert(left_value+right_value);
               $.ajax({
                   url:"{{ route('search.products') }}",
                   method:"GET",
                   data:{left_value:left_value, right_value:right_value},
                   success:function(res){
                      $('.search-result').html(res);
                   }
               });
           });

           $('#sort_by').on('change',function(){
               let sort_by = $('#sort_by').val();
               $.ajax({
                   url:"{{ route('sort.by') }}",
                   method:"GET",
                   data:{sort_by:sort_by},
                   success:function(res){
                       $('.search-result').html(res);
                   }
               });
           });
        })
     </script>

</body>
</html>
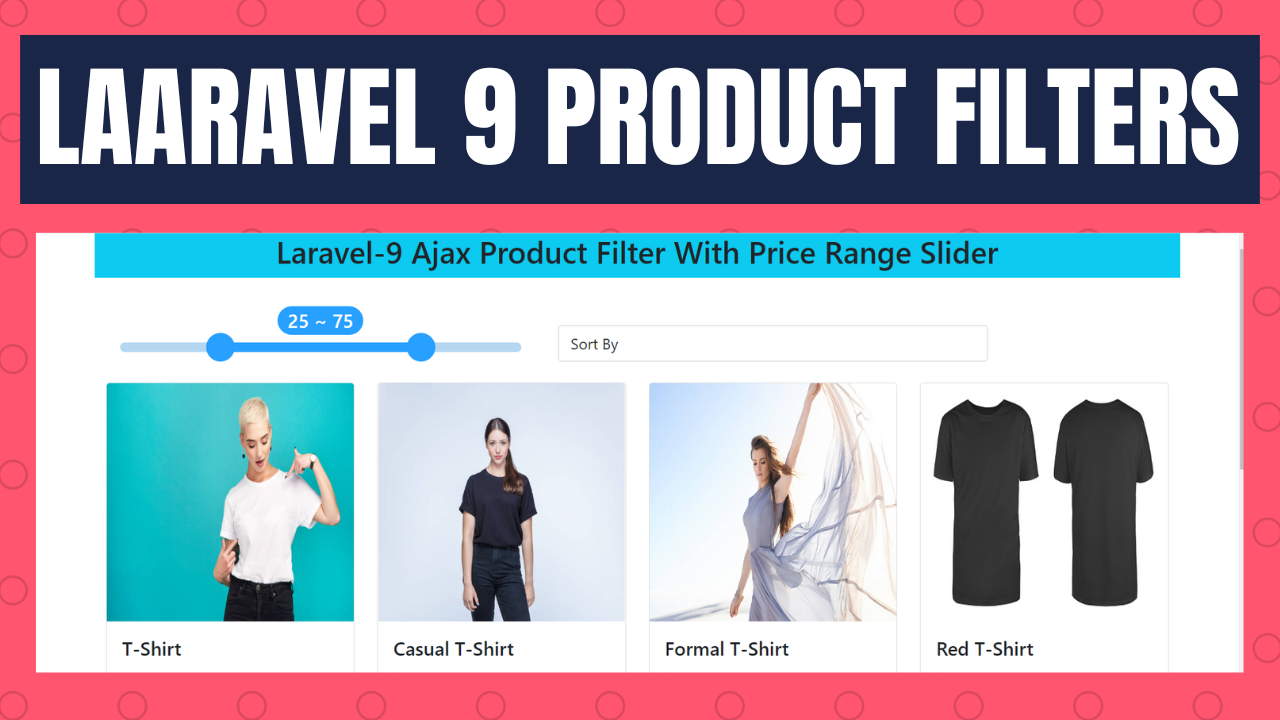
slider.blade.php
<div class="row">
    <div class="col-md-12 bg-info">
        <h2 class="text-center">Laravel-9 Ajax Product Filter With Price Range Slider</h2>
    </div>
    <div class="col-md-5 mb-3">
        <div class="middle">
            <div id="multi_range">
                <span id="left_value">25</span><span> ~ </span><span id="right_value">75</span>
            </div>
            <div class="multi-range-slider my-2">
                <input type="range" id="input_left" class="range_slider" min="0" max="100" value="25" onmousemove="left_slider(this.value)">
                <input type="range" id="input_right" class="range_slider" min="0" max="100" value="75" onmousemove="right_slider(this.value)">
                <div class="slider">
                    <div class="track"></div>
                    <div class="range"></div>
                    <div class="thumb left"></div>
                    <div class="thumb right"></div>
                </div>
            </div>
        </div>
    </div>
    <div class="col-md-5 mt-4 pt-2">
        <div class="middle">
            <div class="multi-range-slider my-2">
                <select name="sort_by" id="sort_by" class="form-control">
                    <option value="">Sort By</option>
                    <option value="highest_price">Highest Price</option>
                    <option value="lowest_price">Lowest Price</option>
                </select>
            </div>
        </div>
    </div>
</div>
search_result.blade.php
@if($all_products->count() >=1)
    <div class="row">
        @foreach($all_products as $product)
            <div class="col-md-3 my-2">
                <div class="card" >
                    <img src="{{ asset('images/'.$product->image) }}" class="card-img-top" style="height:250px;">
                    <div class="card-body">
                        <h5 class="card-title">{{ $product->name }}</h5>
                        <p class="card-text">{{ $product->description }}</p>
                        <h4 class="btn btn-dark">Price ${{ $product->price }}</h4>
                    </div>
                </div>
            </div>
        @endforeach
@else
        <div class="col-md-12 my-5 text-center">
            <h2>Nothing Found</h2>
        </div>
    <div>
@endif
Step-10: Test app
Everything has done, run artisan command and test your app.
php artisan serve
Hope this will helps a lot. Thanks
If you like what you are reading, please think about buying us a coffee as a token of appreciation.

We appreciate your support and are committed to providing you useful and informative content.
We are thankful for your ongoing support
You May Read Bellow Articles:
Laravel 9 live search data in a table using ajax.
How to send SMS in laravel 9 using Twilio SMS API-Webjourney
Laravel 9 pdf invoice generate and download with barryvdh dompdf
How to create multi language website by laravel 9
Laravel 10 multiple form validation on the same page-WebJourney
Multiple parameter pass through Route & URL in Laravel-WebJourney